
Showing posts with label domestic goddesses. Show all posts
Showing posts with label domestic goddesses. Show all posts
Wednesday, November 9, 2011
An Organized Thanksgiving
 Thanksgiving is meant to be a time of remembrance, family and thanks, not a holiday
of stress and chaos. Here are 9 easy ways to stay organized for an enjoyable, stress-free Thanksgiving Day:
1. LEAVE COOKING AND CLEANING BEHIND. These days, many people opt to go out for Thanksgiving, instead of cooking and cleaning at home. If you're an extremely busy person, this may also work for you. If you don't want to miss the feeling of being at home, perhaps you might have the main course at a restaurant, and later have pie and coffee at home. In addition, lots of supermarkets and restaurants offer fully cooked Thanksgiving dinners. You simply pick everything up and place it on your table ready to be served, and if you must add a personal touch, make one special dish of your own.
2. PREPARE FOR TRAVELING. If you're traveling this Thanksgiving, be sure to make your packing list well ahead of time. Check items off as you're putting them into your luggage. Bring this list with you and use it to repack when you're ready to return home. By the way, I usually suggest that you travel a few days before Thanksgiving and come back a few days after the Thanksgiving rush. Otherwise, you're going to spend a lot of time in airports, on the road, in line, etc.
3. LET'S TALK TURKEY. First, determine how much room you have in your freezer and refrigerator, and how many people you will be serving. Then, order your turkey. If you need more storage space, perhaps a neighbor or relative can help you out. Rather than defrosting a frozen turkey in water on Thanksgiving Day, defrost it a few days ahead in your refrigerator instead. This saves tons of time!
4. INVITE GUESTS IN A SNAP. If you haven't already sent out invitations, you may consider simply calling possible guests instead. You won't have to spend a ton of time writing and mailing, and you usually get an RSVP immediately.
5. CHECK YOUR INVENTORY. Check your supply of chairs, tables, dishes, glasses, pots, pans, serving plates and utensils. Arrange to buy, rent or borrow anything you don't have.
6. PLAN YOUR MEAL. Plan your meal from appetizers to dessert on a piece of paper. Make a list of all ingredients needed. Bring your list when you go shopping and check items off as you put them in your cart.
7. COOK AHEAD. Make any meals that you can well ahead of time, and freeze them. On Thanksgiving Day, just defrost, heat and serve. You will save tons of time, plus you'll be able to join in the festivities without being stuck in the kitchen.
8. GET READY THE NIGHT BEFORE. You'll be happy you took care of a few things the night before. Set the table. Get the good silverware out of storage. Lay out your wardrobe--and your kids' wardrobes.
9. DON'T FORGET THE IMPORTANT STUFF. Thanksgiving is a wonderful time to be thankful for health, family, friends and all that life has to offer. Some people choose to say grace. Others prefer to simply have a moment of silence before dinner and football. Still others like to make time to read a Thanksgiving Story or a poem. Make a list of the things you want to do to make the day a special one and reference your list so you don't forget them.
{Originally submitted to The Mommies Network Blog by CharlotteMommies}
Friday, October 14, 2011
5 Uses for Vinegar

Do you want to know how to use up that white vinegar you bought to color eggs with this year? Here are some ways to use it around the house as a cleaner, disinfectant, odor remover, blemish treatment, stain remover, and fabric softener. There are many other ways you can use vinegar as well but these are a few ways that Traci (izzysmom7) and her family use vinegar around their house.
1. As a cleaner/disinfectant: Do you want to freshen up the water lines in your coffee maker? Run a cup of vinegar and two cups of water through the maker. If the maker hasn't been used in awhile run a few cups of vinegar through, discard, and then run a few cups of water through. Make a solution of vinegar and water and use it to clean your counter tops, floors, or any surfaces you need to disinfect. My family and I use full strength vinegar to remove hard water and lime stains in the showers/bathrooms.
2. Odor Remover: Ever come across an odor in a room of your house and not been able to remove it with the typical household odor sprays? Place some apple cider vinegar in a bowl in the room and in a few days the room will be fresh and clean smelling again. My daughter and husband often have allergic reactions to candles and sprays, this has been a great alternative for them. If you want something to use the apple cider vinegar for when you are not removing odors, ask me to share my pulled pork BBQ recipe with you.
3. Blemish Treatment: Do you have a teenager or do you yourself suffer from acne? Nothing is worse than waking up in the morning before you start your day to find a blemish staring back at you in the mirror. When I was in college a friend told me to try placing some vinegar in a bowl, then use a cotton swab to add it to the blemishes. I let it sit for thirty minutes and then rinsed with lukewarm water. No blemish treatment will instantly remove our unwanted blemishes, but this method is a green way to help treat them. I suffer from dry skin so I recommend applying a good moisturizer after the vinegar treatment if you do as well.
4. Stain Remover: How many of your little ones love to stain their clothes with some of those impossible stains? My child prides herself in finding those impossible stains. While I do have stain removers in my house, one day I had more stains than remover. I went to the web to see if there was something I had around the house to help with a pizza sauce stain. I found out that vinegar and baking soda would do the trick. It will smell strong as the baking soda and vinegar bubbles and fizzes but it will remove your stain. Wash your clothes after each treatment the same way you would if you used a store bought cleaner. Extra Tip: If it is a stubborn stain that the above treatment will not remove, place your stained garment(s) out in the sun. The great outdoors will not only give your clothes a fresh smell but the sun will act as a bleach, helping to remove your stains.
5. Fabric Softener: Use 1 to 2 ounces of vinegar in the rinse cycle while doing laundry. It will help remove the soap residue and soften your clothes. You could also place the vinegar in a softener ball as well. Extra Tip: Do you use dryer fabric softener sheets and wonder how to remove the residue they create over time on your dryer lint trap? All you need is some vinegar (more or less depending on the last time you cleaned the trap), water, a scrubbing pad and some elbow grease (may need to scrub harder if you haven't cleaned the trap in a bit). You will the know the trap is clean once the water no longer clings to the top of the trap and flows through it.
Submitted by Traci from NorthMetroDCMommies. Originally posted to the NorthMetroDC Blog.
Friday, October 7, 2011
Time Out For Style
A common complaint of many mothers is the daily struggle of what to wear. Most mothers express exasperation that they dress too casually, and some say, sloppily. Many mothers do not have the time in their busy schedules to devote to finding appropriate and attractive clothing.
Help can be found with a wardrobe consultant who will review your closet, assist you in determining your clothing needs, provide shopping assistance, and organize your closet.
 If you find that you stand in front of your closet full of clothes and have nothing to wear, I recommend that you find someone to watch the children for a half day and devote it to reviewing
the clothing in your closet. Put on some music of your choice and pop open a Diet Coke or have a glass of wine if you're feeling more adventuresome. You'll need to try on everything, unless by sight you find that an item is too worn, stained, or a size that you haven't seen for awhile.
Once you try on the remaining clothing ask yourself the following questions:
1. Does it fit?
2. Does the color suit me?
3. When was the last time I wore this?
4. Does this fit into my current life situation? (i.e. a stay-at-home mom doesn't need a closet full
of power suits);and,
5. Do I like it? (can I run into an old boyfriend and feel attractive?).
Items that don't meet the above criteria can be donated to a charity. Please make sure that the item is in good condition; the rule is to only donate what you would consider buying. Items with tags still attached can be sold on eBay or at a consignment shop. The balance of the items can be
tossed or recycled for your "rag bag."
Most women need the following for a casual winter wardrobe:
1. Jeans in a darker wash;
2. A pair of black pants. The current style recalling Audrey Hepburn looks good on most women
and can be dressed up or down. I recommend that you have several pairs so that when one pair is
in the wash, you have another to wear;
3. A pair of corduroy pants in a boot cut style;
4. A few sweaters in a classic style. I happen to like the J Crew Wesley cable style in the v-neck
so you can layer a blouse or t-shirt under. Plus, they are really soft and wear well;
5. A pair of short boots to wear under your jeans and pants;
6. A pair of flat shoes to wear with your black pants. Try black or an animal print for more style;
7. T-shirts in white and other colors that you like. The Old Navy ones are a terrific value;
8. A sweater coat - a Fair Isle type weave will add pop to your pants and jeans. Also, it doesn't
get that cold in Richmond, and, since we spend most of our days in cars, a heavy coat isn't needed for most days; and,
9. A "real" winter coat for colder days.
That's all you need. I find that the more choices women have, the harder it is to decide what to wear. Pare down and you'll find that you are more confident and ready to face the world!
The best part of the above list is that you can order these by catalog or on the internet. This is my favorite way to shop because I can try the clothing on at my own pace and match them to my existing pieces. No need to drag a 2 and 4 year old through the mall!
Now you need to organize your closet. Take out anything that isn't clothing related. Find a new place for Christmas paper, sport equipment, and toys. When you're doing this it's a great time to streamline your home. Make sure that you are using the same style of hanger; it takes up less rod space. I like the plastic "jewel" style hanger that you find in department stores. You should also buy a few shoe boxes and some baskets to put belts and scarves in. You can get these items at Target for a reasonable price.
Originally posted on RichmondMommies
Help can be found with a wardrobe consultant who will review your closet, assist you in determining your clothing needs, provide shopping assistance, and organize your closet.

the clothing in your closet. Put on some music of your choice and pop open a Diet Coke or have a glass of wine if you're feeling more adventuresome. You'll need to try on everything, unless by sight you find that an item is too worn, stained, or a size that you haven't seen for awhile.
Once you try on the remaining clothing ask yourself the following questions:
1. Does it fit?
2. Does the color suit me?
3. When was the last time I wore this?
4. Does this fit into my current life situation? (i.e. a stay-at-home mom doesn't need a closet full
of power suits);and,
5. Do I like it? (can I run into an old boyfriend and feel attractive?).
Items that don't meet the above criteria can be donated to a charity. Please make sure that the item is in good condition; the rule is to only donate what you would consider buying. Items with tags still attached can be sold on eBay or at a consignment shop. The balance of the items can be
tossed or recycled for your "rag bag."
Most women need the following for a casual winter wardrobe:
1. Jeans in a darker wash;
2. A pair of black pants. The current style recalling Audrey Hepburn looks good on most women
and can be dressed up or down. I recommend that you have several pairs so that when one pair is
in the wash, you have another to wear;
3. A pair of corduroy pants in a boot cut style;
4. A few sweaters in a classic style. I happen to like the J Crew Wesley cable style in the v-neck
so you can layer a blouse or t-shirt under. Plus, they are really soft and wear well;
5. A pair of short boots to wear under your jeans and pants;
6. A pair of flat shoes to wear with your black pants. Try black or an animal print for more style;
7. T-shirts in white and other colors that you like. The Old Navy ones are a terrific value;
8. A sweater coat - a Fair Isle type weave will add pop to your pants and jeans. Also, it doesn't
get that cold in Richmond, and, since we spend most of our days in cars, a heavy coat isn't needed for most days; and,
9. A "real" winter coat for colder days.
That's all you need. I find that the more choices women have, the harder it is to decide what to wear. Pare down and you'll find that you are more confident and ready to face the world!
The best part of the above list is that you can order these by catalog or on the internet. This is my favorite way to shop because I can try the clothing on at my own pace and match them to my existing pieces. No need to drag a 2 and 4 year old through the mall!
Now you need to organize your closet. Take out anything that isn't clothing related. Find a new place for Christmas paper, sport equipment, and toys. When you're doing this it's a great time to streamline your home. Make sure that you are using the same style of hanger; it takes up less rod space. I like the plastic "jewel" style hanger that you find in department stores. You should also buy a few shoe boxes and some baskets to put belts and scarves in. You can get these items at Target for a reasonable price.
Originally posted on RichmondMommies
Wednesday, October 5, 2011
DIY Chair Upholstery.....With A Toddler

First, RJ, myself and my mother visited a local fabric store and selected a print we loved made of outdoor material. The fabric we chose is waterproof and allows for easy clean up when soiled. Perfect for a home with a 3.5 year old toddler and infant just learning to eat solids!
First step: Remove the padded seats from the chair base. Four screws and they were off!


One last check for size...

and we started stapling.


and we started stapling.

Staple guns, with their loud sounds, are like child magnets. "Can I do that?" was a consistent phrase during this step of the process. I knew that if I let him help, it would take double the time because we would have to be extra careful to ensure his safety. My first instinct was to say, "No." Then I stopped myself and asked,"What's the rush?" Plus, who wouldn't want to play with such a fun gadget. So, I showed him how it worked, held it in place and let him push down the lever! No problems! Plus, as is the case with 3yo boys, by the time we completed the first chair, he was off to something else, returning every now and then to get his staple gun fix!
BEFORE:

AFTER:

Lastly, we rescrewed the newly upholstered cushions back into the chair bases.

and, "Taaaa Daaaaaaaa" Brand new chairs!


So, when there's a project around your house that probably won't end in destruction, try to do it yourself and, if you have children, include them in the process. In addition to getting the job done, you can teach about units of measurement, count to 100, and even engage in imaginary play with the extra fabric, "You can't see me!"

Doing projects like this with my parents is a part of the moments I remember as a child. So, when the opportunity presents itself, consider taking the time to create these types of life memories with your loved ones.

Post submitted by DeLise (ShepherdHearts) from NorthMetroDCMommies.com
Originally Posted on Our Life Memories Blog on April 15, 2011
Originally Posted on Our Life Memories Blog on April 15, 2011
Wednesday, September 28, 2011
Organizing Kids' Rooms

Step One: Clear The Clutter!
The very first step towards bringing calm and order to the chaos is getting rid of the clutter. Start by sorting through everything in the room and remove as much as possible that doesn't NEED to be there starting with the floor. Well...you do NEED the floor, but you get what I mean.
I find that using three large bags or boxes marked donate, trash, and keepers works well for making quick work of this step. Just grab the item and toss it right into it's new home. Yeah, we can see a floor again!
Step Two: Stow The Stuff
Now that you've cleared the clutter, step two involves organizing and storing what's left using kid friendly storage items such as bins, bookshelves, clear containers, cubbies, hooks, etc. Every item will need a place to call "home." The key here is finding an easy system that's right for your child and will motivate them to be and stay organized.
If you find that even after the big purge your child still has too many toys and books or you just want to limit the amount of stuff in your child's room in general, rotate them. Just pop a few of them into a box and stash them away. After about a month or so, pull them down and trade them out. Rinse and repeat. They'll get a real hoot out of re-discovering their "new" old toys.
Step Three: Maintain Order (No, really)
Ok, so now that the hard part of clearing the clutter and stowing the stuff is out of the way, it's time to set some simple ground rules to help make staying tidy and organized a part of each day. In addition to the usual "put it away when you're done," I find that having a "Morning Pick-up
Routine" and an "Evening Pick-up Routine" really helps us a lot.
This will help them to stay ahead of any messes that would have otherwise accumulated during the week making it one large project to tackle over the weekend. That's no fun! Speaking of "staying ahead of messes," here's a tip inside of a tip. Set up a "Donation Station" in a place where everyone has access. Whatever works best for your family, a hall closet, laundry room, garage, etc. Whenever family members come across something that they no longer want or use, it goes into the "Donation Box." When the box is full, drop it off at your local donation center.
Your family will benefit in 3 ways:
1.) You enjoy a less cluttered home
2.) You help other families
3.) You get a tax deduction (be sure to ask for a receipt)
Everyone's a winner!
Don't worry if your child's bedroom doesn't exactly look like a page torn from the latest Pottery Barn Kids catalog. (A girl can always dream right?) That's not the goal. What's important is that they learn to be responsible for their own things. A valuable lesson that will serve them well for years to come.
Originally posted on FrederickMommies.com
Friday, September 16, 2011
My Lips are Lovin' Me!!
 When I made my first "homemade product" over a year ago. I was such a consumer. It wasn't quality if I didn't buy it right? I was just looking to be frugal. Wrong! Instead of frugal, I am making high quality products for pennies compared to store bought
 Recently the make-my-own bug has bitten me. Renee over at FIMBY has been motivating me for several months now...and so after loving my laundry soap, then deodorant (will never buy Secret again), followed by my homemade soap which is curing right now awaiting my Mother's Day. I have yet again made something I will never go back to buying! My lips are in L.O.V.E.
I must give Renee the credit for the recipe. I am still learning, but the more I make my own, the more I am branching out to create my own.
I think the hardest part of making my own products is actually gathering the supplies. In this case most of my ingredients came from my local organic health store. Once I have them on hand, it takes no time at all to be reaping the benefits of my own goods.
A few of you have asked where I got my supplies, so I noted it for you. I am sure you could get it online too.
Ingredients
- 1/2 oz. (approx. 3 tsp.) grated or roughly chopped beeswax (local organic Co-operative)
- 1 oz. (approx. 6 tsp.) coconut oil (local organic Co-operative)
- 1 1/2 tsp. lanolin (Left over from Breast feeding my babes)
- 3/4 tsp. vitamin E (I had capsules in my cabinet and poked holes in them to add up)
- 2 tsp. hard honey (local organic Co-operative)
- 3/4 tsp. peppermint essential oil (local organic Co-operative)
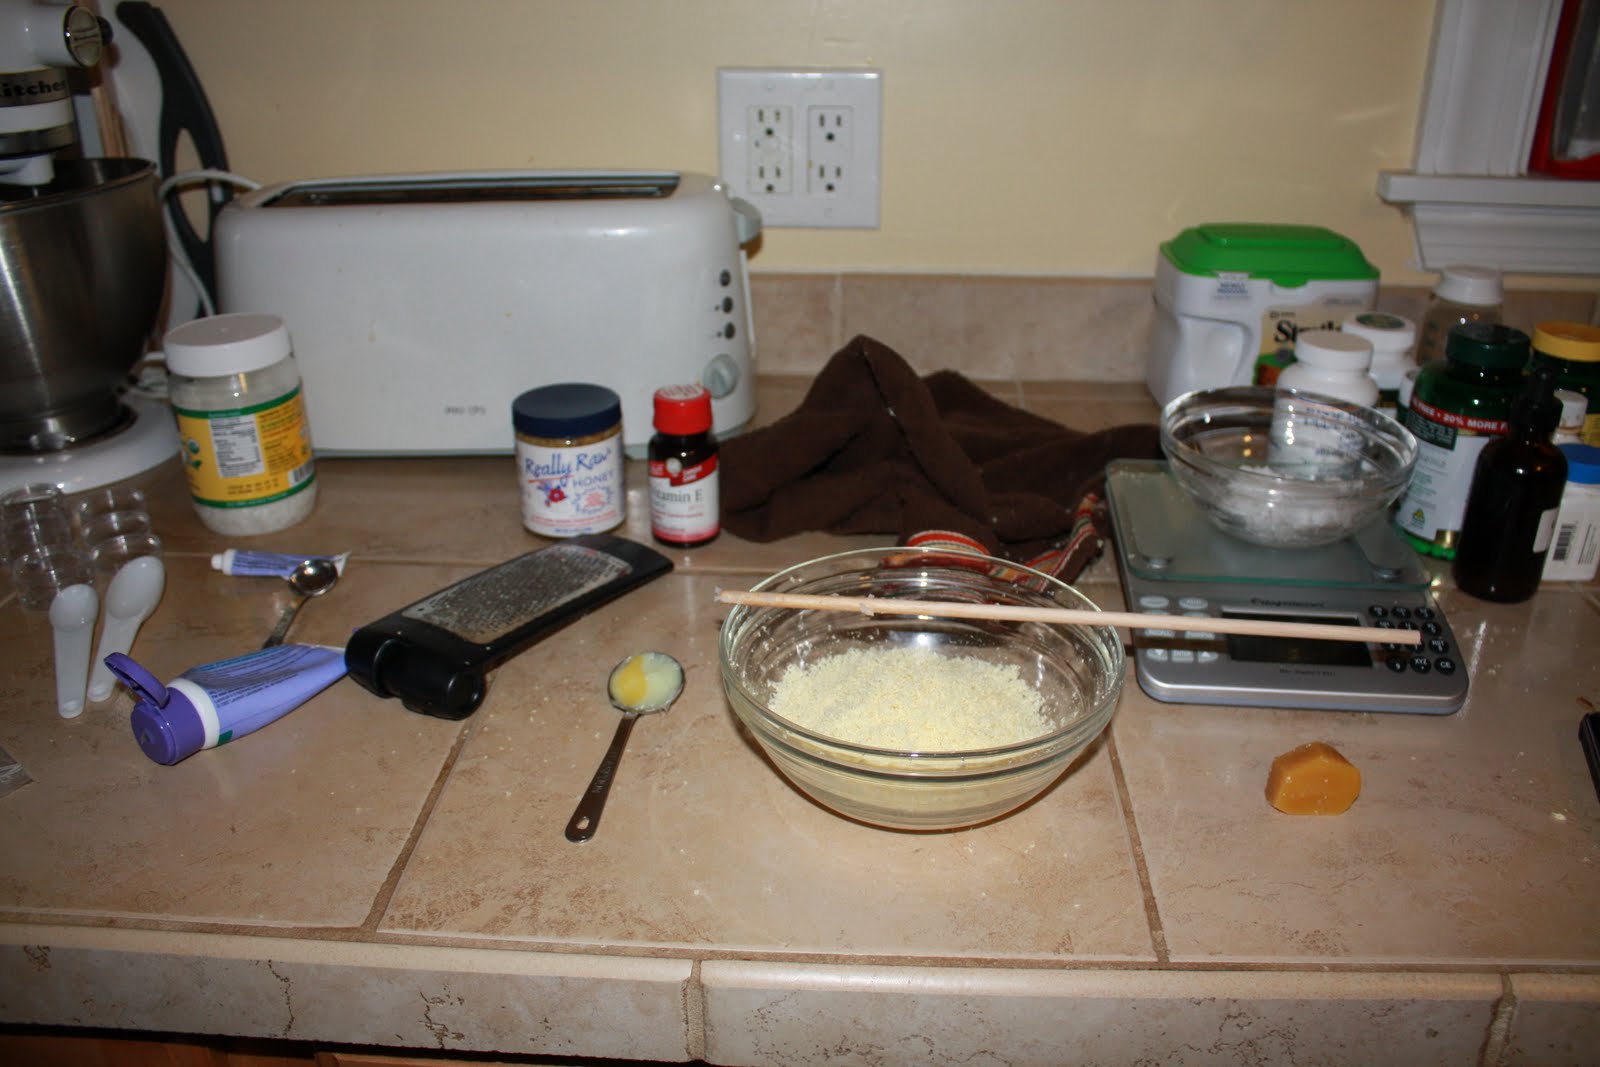
Assemble what you need:
This actually takes the longest, the making is a breeze!

Grate the beeswax and melt with the coconut oil, Lanolin, and Vitamin E. It was the consistency of vegetable oil when melted completely.
Second add the Peppermint extract and Raw honey (some know it as hard honey). If you are buying it new for this purpose I would scrape the top and use for something else. Particles don't break down well.

Mixing the peppermint extract and Peppermint was tricky to incorporate. You have to be really fast. I started with a wooden dowel but quickly moved to a rubber spatula which worked so much better for me.
I did have to reheat some to pour it in. I do not prefer the tubes, as much as the round containers. It goes on so smooth and the peppermint is yummy and tingly.
The best part of making my own, is there is always plenty to share with others. I love being able to pass some on to family and friends to enjoy as well.
Try it for yourself and let me know how you like the recipe. If I can do this you you definitely can do this!
Submitted by Elizabeth from NorthMetroDCMommies. Originally published on The Whimsical Housewife on 4/28/11.
Friday, September 9, 2011
Back To School The Healthy Way
As the beginning of school fast approaches, we are faced with another year of lunch box choices. Children form their eating habits ealry and it is wise to get them into the habit of packing and eating a healthy lunch.
 Most heart disease, obesity, osteoporosis and other life long diseases begin to develop in childhood. Usually, it is a handful of foods that do the most damage and so a handful of changes can go a long way towards a healthy diet.
Let your children help pack their lunch box and offer them healthy choices. Tell them the benefits of their choices. Children truly do like to be educated and it is amazing at how much healthy information they will retain and perhaps even share with others. By offering them choices, they will feel as if they have had a say in their lunch and you will be confident that they will make a wise healthy choice. By adjusting your child's lunch box menu, you can add energy to their day, years to their life, and a healthy attitude about eating in the future.
Remember the following tips and do not forget " A handful of changes goes a long way".
1. Milk should be 1% or fat free. Whole milk is the largest source of saturated fat in a child's diet. Milk keeps hearts healthy and arteries clear.
2. When using cheese, opt for low fat or fat free. Cheese is the 2nd largest source of artery clogging fat.
3. Switch from regular lunch meat to low fat or fat free. Often they taste quite the same!
4. Always offer a fruit choice. Apples, oranges, grapes, bananas, fruit cups or applesauce. Try serving them in a variety of ways to keep it exciting. Also offer yogurt or peanut butter as a dipping sauce.
5. Always offer a vegetable choice. Vegetables reduce your child's chance of heart disease, cancer, stroke and blindness later in life. Offer small carrot sticks, celery, cucumbers. broccoli or small salads. Offer ranch dressing for vegetable dip.
6. Use whole grain bread instead of white bread. The label must indicate that it is "whole wheat".
7. Limit sugary snacks such as sweets, cakes, candy and doughnuts. Most teachers will appreciate this as well.
8. Replace regular potato chips with baked chips, pretzels, nuts, breadsticks or low fat crackers. Also beware of Olean (olestra) products, these can cause cramping and diarrhea. They can also rob your child's body of important cancer fighting carotenoids and phytochemicals. One ounce of Bugles contains as much fat as a McDonalds Quarter Pounder.
9. Use 100% fruit juice, water or flavored water for drinks. Most other juices have only 10% fruit juice and as much sugar as soda.
10. If you use Lunchables, buy the low fat Lunchables. Regular Lunchables get 2/3 of their calories from fat and sugar.
Have a safe and healthy back to school!!!
Originally posted on CharlotteMommies.com
Wednesday, August 17, 2011
5 Little Sayings to Help You Get Organized
'Spring Ahead. Fall Back.' That little saying always helps us remember whether we should set the clock ahead or back one hour. Similar little sayings, are also great for helping you to get and stay organized. Here are just a few:
1. A HOME FOR EVERYTHING AND EVERYTHING IN ITS PLACE. Every item you have, no matter what it is, should have a designated home. For instance, the home for your magazines might be your magazine holder, which is located on your bookshelf. Or your home for your extra file folders and labels, might be the top shelf of your office supplies cabinet. If an item doesn't have a specific home, it's considered to be 'homeless.' Something that is homeless, tends to get lost. Designate a specific home for all of your stuff. Then, be sure that everything taken, gets returned to its home when done being used.

2. DON'T PUT IT DOWN. PUT IT AWAY. When you remove something from its home, the best thing to do when you're done using it, is to put it away. Yes, sometimes it seems easier to just place it on the kitchen table until later, or to put it on your desk until tomorrow. Unfortunately, this often results in many items being out of place, which can leave your home or office in disarray. Never mind the fact that it presents a bad example for other family members, or staff members. Don't give clutter a chance to form. Put it away now. You'll find it when you need it, and your environment will remain clutter-free.
3. FILE, DON'T PILE. It is very easy to get overwhelmed with paper. Our paper volume increases on a daily basis. Between lists, mail, bills, school papers, documentation, warranties, etc., it's often seen as a pain to take the time to handle those papers immediately. However, if those papers begin to transform themselves into piles--and they usually do--it's going to be even more of a pain to get them under control. Piles tend to get taller and taller, until even the idea of dismantling them seems colossal. This results in lots of piles, and even more stress. If you DON'T need a piece of paper, get rid of it immediately. Either recycle it, or give it to the appropriate party. If you DO need a piece of paper, file it right now. Don't put it down, even for a minute. Either place it in your filing cabinet, your Tickler file, your bill paying system, etc. If you take the time to file it now, it won't stand a chance of growing into a huge pile.
4. QUALITY OVER QUANTITY. Clutter and chaos go hand in hand. The more things you have, the easier it is for clutter to form and grow. Always remember to place your emphasis on quality over quantity. In other words, it's not important to have a lot of things, many of which you never use. It's more beneficial to have fewer things, all of which you use and/or enjoy. Simplify your life and you will get and stay organized!
5. FIND EVERYTHING YOU NEED WHEN YOU NEED IT, GET EVERYTHING DONE WHEN IT'S DUE. Many people think that getting organized is about being neat and tidy. On the contrary, a person who is not very neat or tidy, can be very organized. Being organized actually entails 'finding everything you need when you need it, and getting everything done when it's due.' If you can master these two things, you are well on your way to being organized.
Post submitted by Maria Garcia
{Originally submitted to CharlotteMommies}
Wednesday, July 27, 2011
How To Save Money On Your Grocery Bill
1. Shop In Season
If you buy fresh fruits and vegetables that are in season, you will spend less money. As an added bonus, your food will taste better too. Foods that are shipped in from faraway places so that we can eat them out of season - think strawberries, oranges, cucumbers in the winter - have the added cost of transportation to get them to the store. Resist buying that hot house tomato in January. It isn't going to taste good anyway! If you have Farmer's Markets in your area, consider shopping there for local produce. Chances are it will be less expensive, taste better and be organically grown.
 2. Shop Sales
Pay attention to the sales that your store is advertising. Buy only what is on sale, instead of buying based on cravings. Most stores post weekly and monthly sales. Find out the sales cycle of your favorite grocer because they don't all run Sunday to Saturday.
3. Plan Meals around Sales
Plan your meals for the week around the weekly sales. Chicken and ground beef are on sale this week? Great - plan your menu to include chicken enchiladas, stuffed chicken breasts, tacos and sloppy joes.
4. Sign up for Store Rewards Cards
By signing up for store rewards cards, you will pay the lowest price for the items in that store. You will also be eligible for special deals and promotions and may receive coupons in the mail directly from the store itself. Your receipt will show you how much you have saved just by having that special card.
5. Sign up for Store email Notices
Many grocery stores now have online coupons and unique online specials. If you sign up for their email notices, you will be in the know about these special coupons and deals. Stores also use their email lists to notify customers of events like super doubles and triples.
6. Use Coupons
Shop with coupons. You can find coupons in the Sunday paper, online, in the grocery store fliers, on special bulletin boards throughout the grocery store, on store shelves, on wine bottles and in blinking machines situated inside grocery stores. You may think that buying generic is always cheaper, but that is often not the case. By combining sales with coupons, you can often get items for free.
7. Plant a Garden
Feed a man and he eats for a day. Plant a garden and you can eat all year long. Fresh fruits and vegetables are expensive, even in season. Buy seeds and plant a garden for a fraction of the cost. Even apartment dwellers can plant small window gardens.
8. Eat Before you Shop
Never shop on an empty stomach. Make sure you eat before you head to the grocery store. Studies show that hungry shoppers spend more money.
9. Leave your Kids at Home
Shop by yourself whenever possible. Children often ask for empty calorie foods and have no concept of cost. Many a mom has broken down and handed over as box of cookies just to get some peace and quiet. Leave them home, shop in quiet and stay on budget.
10. Take a List and Stick to it
Get out your sales fliers, your coupons and your email notices ahead of time and make a list of what you need to buy for the week. Be sure to take your list and a pen with you on your shopping trip and determine to buy only what you have on the list. You will avoid impulse buys this way.
Post submitted by Melissa from TriangleMommies
{Originally submitted to The Mommies Network Blog on April 29, 2011}
Subscribe to:
Posts (Atom)


